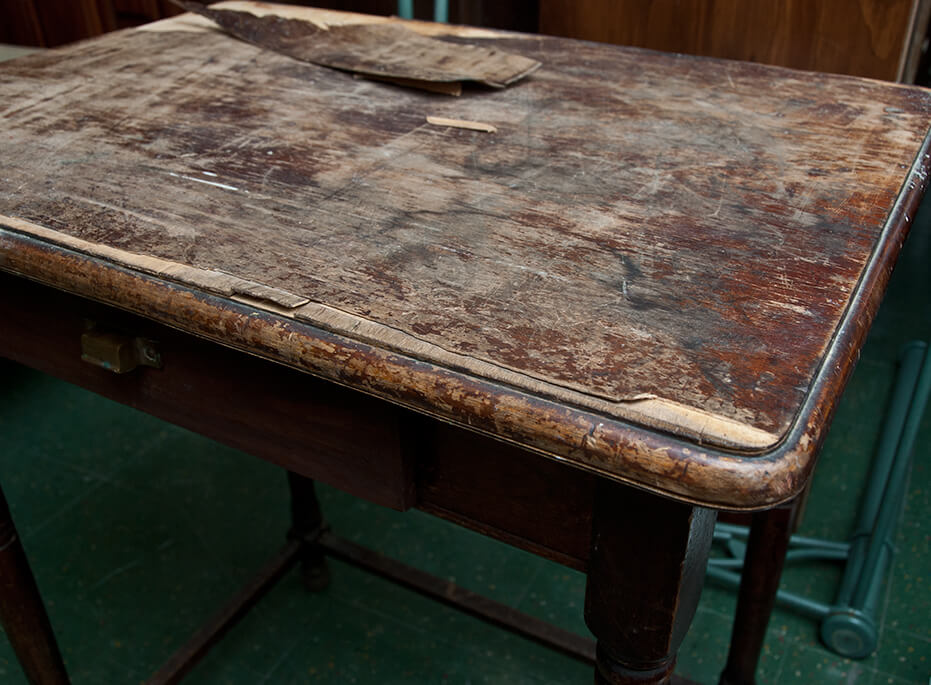
The Ultimate DIY Guide to Restoring Your Veneer Pieces to Look Brand New
Don't let bubbling, peeling, or chipped wood veneer force you to discard a beloved piece of furniture. Replacing or removing wood veneer is a popular and rewarding DIY project that can bring new life to tables, cabinets, and dressers.
This comprehensive guide will walk you through the entire process, from stripping the old veneer to applying the perfect replacement sheet.

1. How to Remove Wood Veneer: Step-by-Step
Removing the old, damaged veneer is the first and often most crucial step. There are two primary methods, depending on the type of adhesive used.
Method 1: The Heat/Iron Method (for Older Adhesives)
This is the most common method for older furniture where heat-activated glues were used.
-
Prepare the Surface: Set a household clothing iron to a medium or high heat setting with NO steam.
-
Heat the Veneer: Place a damp towel or rag over a small, peeling section of the veneer.
-
Apply Heat: Press the iron onto the towel for 10-15 seconds. The heat will travel through the towel, reactivating the old adhesive underneath the veneer.
-
Lift and Scrape: Immediately insert a flexible putty knife or scraper underneath the veneer. The loosened sheet should lift away easily.
-
Repeat: Move the iron to the next section and repeat the process until all the damaged veneer is removed.
Method 2: Chemical Solvent (for Modern or Difficult Adhesives)
If the heat method fails, you may need a chemical approach (often for contact cement).
-
Safety First: Ensure you are in a well-ventilated area and wear appropriate safety gloves and goggles.
-
Apply Solvent: Apply a small amount of lacquer thinner or mineral spirits to a rag.
-
Soak and Scrape: Dab the rag along the peeling edges of the veneer. Allow the solvent a few minutes to penetrate the glue.
-
Remove: Use your putty knife to scrape the softened veneer and adhesive residue from the substrate (the wood underneath).
-
Clean the Substrate: Once all the veneer is removed, clean the bare surface thoroughly to remove any remaining adhesive residue before proceeding to replacement.
2. Detailed Guide: Replacing Veneer on a Table Top
Table tops are a key focus for replacement projects. Follow these steps for a clean, professional finish on any large, flat surface.
Tool Checklist
-
New Wood Veneer Sheet (larger than your table top)
-
High-Quality Veneer Adhesive (Contact Cement or PVA Glue)
-
Applicator (Roller or Paintbrush)
-
J-Roller (or Rolling Pin)
-
Clamps or Heavy Weights (for PVA glue)
-
Router with a Flush Trim Bit
-
Razor Blade or Sharp Utility Knife
Replacement Steps
-
Prepare the Substrate: Ensure the table top is clean, smooth, and dry. Sand away any remaining glue or inconsistencies.
-
Apply Adhesive: Apply an even, consistent layer of veneer glue to both the back of the new veneer sheet and the surface of the table top. Allow the glue to become tacky according to the manufacturer's instructions.
-
Position the Veneer: Carefully lay the new wood veneer sheet onto the table top, ensuring you have overhang on all sides. Once contact cement touches, it cannot be moved, so be precise!
-
Apply Pressure: Starting from the center, use a J-roller to apply firm pressure across the entire surface. This ensures the best possible bond and pushes out any air bubbles.
-
Trim the Edges: Once the glue is set, use a Router with a Flush Trim Bit to carefully trim the veneer exactly flush with the edge of the table. For rounded edges, a sharp razor blade may be necessary.
-
Edge-banding (Optional): If the edge of the table is exposed, apply matching veneer edge-banding to cover the substrate.
3. Replacing Veneer on Vertical Furniture Surfaces
Replacing veneer on furniture like cabinets, dressers, or cabinet doors requires special attention to gravity and positioning.
Key Considerations
-
Cabinet Doors: If possible, remove the door or drawer front and lay it flat. This makes the replacement process identical to the table top steps above.
-
Vertical Surfaces (Adhesive Choice): When working on a piece you can't lay flat (like the side of a large dresser), contact cement is usually preferred. It bonds instantly and won't sag due to gravity, unlike slow-curing PVA glue.
-
Clamping: On a vertical piece, use strong clamps (like spring clamps) along the edges of the applied veneer until the glue is fully cured, even with contact cement, for the strongest possible bond.
Tip for Drawers/Cut-Outs
Apply the veneer over the entire surface first. Once the glue is cured, use a sharp utility knife and a straight edge to carefully cut out the drawer opening or cut-out from the back side, ensuring a clean, professional line.
Frequently Asked Questions (FAQ)
Q: Can I put new veneer over old veneer?
A: It is not recommended. While some might attempt this if the old veneer is perfectly flat and adhered, the new veneer will only be as stable as the old layer underneath. To ensure a professional, long-lasting finish, it is always best to remove the old veneer first.
Q: What is the best glue to use for wood veneer replacement?
A: Contact Cement is the easiest for DIY projects as it bonds instantly and is great for vertical surfaces. PVA (Polyvinyl Acetate) Glue is often preferred by professionals for a strong, gap-filling bond, but it requires clamps and weight for 24 hours.
Q: How can I tell if my furniture is veneer or solid wood?
A: Look for the wood grain pattern. If the pattern on the top and the side of the piece don't match or look suspiciously uniform, it's likely veneer. Also, check the bottom edge: if you see two distinct layers (a thin decorative layer and a thick substrate), it's veneer.

