

When a homeowner wants to update a tired kitchen, full cabinet replacement is rarely the smartest financial move. If the existing cabinet boxes are structurally sound, tearing them off the drywall wastes thousands of dollars in demolition, plumbing, countertop removal, and unnecessary carcass construction.
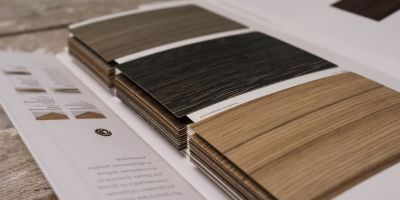
Cabinet refacing—also called cabinet resurfacing—bridges the gap between a cheap paint job and a total teardown. By wrapping the existing face frames and end panels in real wood veneer sheets and hanging new doors, you deliver a brand-new, high-end hardwood kitchen at a fraction of the cost and turn-around time.
Whether you are a custom shop estimator bidding a residential remodel or a skilled DIYer tackling your own kitchen cupboards, here is everything you need to know about material selection, step-by-step refacing execution, and true project costs.
Refacing vs. Refinishing vs. Replacing: What's the Difference?
Before pulling doors off hinges, make sure refacing is the right strategy for the box condition:
- Cabinet Refinishing (Restaining/Painting): Stripping, sanding, and repainting or restaining existing doors and face frames. It is low-cost, but it doesn't fix damaged wood, change the species, or alter door profile styles.
- Cabinet Refacing (Resurfacing): Leaving the sturdy cabinet carcasses in place while applying fresh wood veneer sheets over the face frames and end panels, capped off with new matching doors and drawer fronts.
- Full Replacement: Demolishing cabinet boxes down to bare drywall and installing entirely new carcasses. Necessary only if boxes are water-damaged, rotting, or the kitchen footprint is being completely re-configured.
Choosing Your Refacing Veneer: PSA (Peel & Stick) vs. Paper-Backed
The success of your refacing job comes down to selecting the right veneer backing for your application environment and skill level.
|
Veneer Material Type |
Application Method |
Best Application |
Shop Floor Pros & Cons |
|
Peel and Stick (PSA) Wood Veneer |
Pressure-sensitive adhesive backing; peel protective film and roll firmly onto prepped frames. |
On-site face frame refacing, residential DIY, fast turnarounds. |
Pros: Zero glue mess, fast setup. Cons: Requires a dead-flat, ultra-clean surface; zero repositioning once stuck. |
|
Paper-Backed Veneer (10-mil / 20-mil) |
Applied using solvent-based or water-based contact cement on both substrate and veneer backer. |
Large cabinet end panels, deep side runs, custom shop workers. |
Pros: Highly flexible around tight face frame corners. Cons: Requires contact cement flash time and proper ventilation. |
|
2-Ply (Wood-on-Wood) Backed Veneer |
Applied using contact cement or PVA in press setups. |
Covering heavily textured, damaged, or uneven face frames. |
Pros: Maximum stability; completely masks underlying core defects. Cons: Thicker edge to trim and sand flush. |
Step-by-Step: How to Reface Kitchen Cabinets Like a Pro
To get a seam-free, permanent bond that won't lift when exposed to kitchen steam and grease, follow this bench-tested workflow:
1.Surface Preparation:Degrease and Sand Core Frames.
Remove all cabinet doors, drawers, and hardware. Scrub the face frames down thoroughly with TSP (trisodium phosphate) to remove decades of cooking oils. Once dry, sand the frames with 120-grit paper to create a mechanical key for the adhesive. Wipe away all micro-dust.
2.Side Panel Layup:Apply Box End Panels First.
Cut your 10-mil paper-backed or PSA sheets 1 inch oversized on all sides. Apply your 4x8 wood veneer sheets to the large exposed side panels of the cabinet runs first. Press firmly from the center outward using a rigid veneer scraper to eliminate air pockets.
3.Face Frame Strips:Cover Stile and Rail Face Frames.
Cut veneer strips slightly wider than your face frame stiles and rails. Apply vertical stiles first, followed by horizontal rails. Overlap rail joints cleanly, then score through both layers with a sharp utility knife and straightedge to create a seamless butt joint.
4.Precision Trimming:Trim and Flush-Edge.
Trim excess material overhang using a double-edge laminate trimmer or a brand-new razor knife angled slightly inward. Lightly block-sand edges with 180-grit paper to blend the veneer seam smoothly into the frame corners.
5.Doors & Hardware Installation:Hang Matching Doors & Edge Banding.
Install new, pre-finished matching doors using modern soft-close concealed hinges. For exposed cabinet shelf edges, apply matching iron-on wood edge banding to lock in a consistent hardwood finish across the entire carcass.
Cabinet Refacing Cost Realities: DIY vs. Contractor Bids
Understanding the math behind refacing helps estimators submit profitable quotes and gives homeowners a clear picture of material values.
- DIY Material Cost (Average Kitchen): $800 – $2,200
Covers 4x8 wood veneer sheets, matching edge banding, PSA rolls, contact cement, finish coats, and new door/drawer pulls. - Professional Turnkey Refacing Contract: $4,000 – $9,000
Includes custom door manufacturing, full face frame layup, shop labor, finish matching, and on-site crew installation. - Full Custom Cabinet Replacement: $14,000 – $30,000+
Includes teardown, new carcasses, counter removal, plumbing reconnects, and dry-fit installations.
Shop Tip for Refacing Inset Frames: Always test your adhesive bond on a small hidden section of the face frame before committing to the whole kitchen. If old varnish or lacquer is flaking underneath, no adhesive on earth—PSA or contact cement—will hold long term. Strip flaking finishes back to raw wood before applying fresh veneer.
The Shop Bottom Line
Learning how to reface kitchen cabinets properly adds a high-margin, low-overhead service tool to any shop's arsenal. By prepping your cabinet frames thoroughly and matching the right sheet backing (PSA vs. paper-backed) to the job site environment, you deliver a clean, durable, factory-smooth kitchen transformation without the mess of a full teardown.