


Walnut wood is very strong and very hard. It is also a very handsome, dark wood with rich color and luster. These features make it a choice wood for the construction of solid hardwood furniture.
These features also make it a top choice for furniture projects using walnut veneer.
But any veneer project can be plagued by issues associated with bubble formation once the veneer is applied.
This short guide will cover some of the causes, as well as what you can do to fix bubbles that pop up.
Why Bubbles Form in Veneer Sheets
There are several reasons that bubbles might form under your walnut veneer and other sheets after application.
One, and probably the most common, when using contact cement is not applying enough pressure when laying the sheet onto the substrate. It is recommended that you use a veneer scraper to apply pressure as you smooth out the veneer. A veneer scraper can be fashioned out of a piece of scrap stock roughly 4” wide and at least 16” long. You want to create a slight radius on the edge that is coming in contact with the veneer which can be done by sanding the edge or using an 1/8” radius router bit to ease the edge.
Do not use a J-roller to apply wood veneer sheets, you just won’t get enough pressure to seat the veneer adequately.
Another reason with contact cement can be is not stirring/agitating the adhesive to distribute the solids properly which can cause a weak bond. Also, inadequate coverage of the adhesive, you need 100% coverage on both the substrate and the backer side of the veneer to assure the best results.
Finally, moisture plays a big role. Which is why it is important to acclimate both the veneer and the substrate for a minimum of 48 hours. If there is excessive moisture it will affect the way the glue will flash off (dry) before applying the veneer to the substrate. If done too soon it can trap gasses between the veneer and the substrate which will in turn cause bubbles.
Any of these problems (and others) can cause bubbles to form under walnut veneer. So, what can you do about it?
First, You Need to Find Them
You may be able to feel some bubbles in veneer, but more than likely you won’t be able to feel the relief with your fingertips alone.
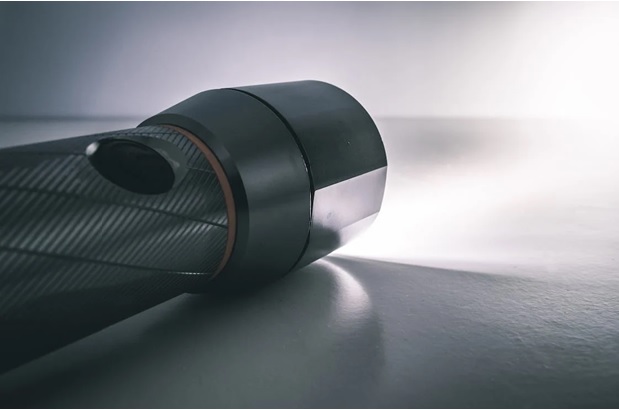
One way to detect bubbles is with a powerful flashlight. Bring it low to the surface of the veneer and shine the light across it. The bubbles will cast a relief shadow over the surface of the veneer.
By the way, best practice is to use the light technique immediately after scraping the veneer out, before the adhesive sets. That way, if there are any bubbles, you may be able to force them out while the glue is still wet.
Once you find the bubbles, even after the adhesive has dried, there are a few ways you can go about rectifying the issue.
What to Do
Depending on how sharply the bubble is raised and how large it is, you may be able to fix the issue with an iron.
The presence of heat can reactivate some adhesives, while also improving distribution over the veneer backer and substrate surface.
Place a piece of craft paper (like a brown paper bag) or a cotton cloth over the face of the veneer, and heat up an iron. Then, run the iron over the cloth/paper on top of the veneer to reheat the adhesive.
Remove the iron and covering, and use a clamp (if possible) to press out the bubble.
This technique may work on small bubbles, but often, with the air trapped, it has no way to go and you will need to make an incision in the face of the veneer to release the air.
To do this, you will need a razor-sharp craft knife with a very fine bevel.

Make a very small incision over the middle of the bubble. Be careful to cut along the grain of the wood. The fibers will naturally separate if you drive the blade between them, but you will cause damage, possibly even tearout, if you attempt to cut across the grain rather than along it.
With this slit made, apply a little bit of the adhesive you used under both sides of the veneer using either a syringe or the tip of a toothpick. If using a syringe and your adhesive is water-based, you may be able to thin it out with a little water so that it flows more readily through the tip.
Once you’ve reapplied a bit of adhesive, press both sides of the slit down and clamp them firmly in place. Wipe away any adhesive that leaks through the slit. If the bubble was in the middle of a veneered surface that can’t be clamped, place a heavy weight down on top of it, such as a few heavy books. This is not as good as clamping but it might work.
Check your work in a few hours or the next day (depending on recommended drying time) to assess the situation. You should be set.
High-Quality Walnut Veneer for Your Next Project
Looking for high-quality American Black walnut veneer for your next project? Get it here. We carry flat and quarter cut walnut wood veneer as well as random planked walnut and walnut burl veneer, along with a wide range of other options with unique grain orientation and beautiful figuring.
For more information, or if you have any questions before beginning your next project (such as how to prevent bubbles in the first place) feel free to get in touch with us at 800-426-6018.