

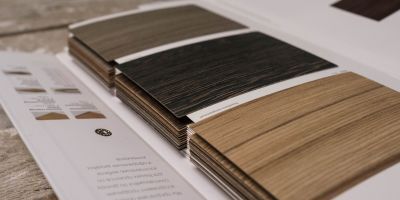
If your kitchen cabinet doors have solid wood frames or real wood faces that are structurally sound, tearing out the whole kitchen just to change the color is money down the drain. Over time, UV rays yellow old clear coats, grease builds up around handles, and factory stains fade near the sink.
Restaining kitchen cabinets—or refinishing cupboard doors back to raw wood—lets you completely reset the look of a kitchen while keeping the existing woodwork intact.
Refinishing cabinet doors yourself isn't complicated, but it is labor-intensive. If you skip steps on degreasing or rush through sanding, your fresh stain will blotch, run, or peel off within months. Here is a straightforward shop guide to stripping, sanding, and restaining kitchen cabinets for a durable, professional-grade finish.
Refinishing vs. Restaining: Which Method Do Your Cabinets Need?
Before grabbing a sanding block, determine how far back down to the bare wood you actually need to go:
- Scuff-Coat & Recoat (Refinishing): If the wood color underneath is fine but the top clear coat is dull or lightly scratched, you don't need to strip down to raw timber. Scuff-sand the existing finish with 220-grit paper, wipe it clean, and apply a fresh clear topcoat to restore depth.
- Full Strip & Restain (Restaining): If you are changing color (e.g., going from honey oak to rich espresso or modern walnut tones), or if the old finish is peeling, water-damaged, or sticky, you must remove the existing coat entirely back to bare wood before restaining.
Bench Decision Matrix: Refinish, Restain, or Reface?
|
Project Goal |
Refinishing (Clear Coat Only) |
Restaining (Color Change) |
Cabinet Refacing |
|
Existing Wood Condition |
Great shape, finish is just dull |
Good shape, but color is dated |
Damaged frames or cheap thermofoil faces |
|
Color Alteration |
None (Preserves existing stain) |
High (Go light-to-dark or change tone) |
Complete species swap via new veneer |
|
Labor Profile |
Low (Light scuffing + clear coat) |
High (Full stripping & deep sanding) |
Moderate (Veneering frames + new doors) |
|
Material Costs |
Minimal (Sandpaper + topcoat) |
Low (Stripper, stain, sealers, topcoat) |
Moderate (Veneer sheets + new door fronts) |
Step-by-Step: How to Restain Kitchen Cabinets
To get an even, blotch-free stain on wood cabinet doors, follow this step-by-step refinishing protocol:
1.Disassembly & Degreasing: Label Everything and Pull Hardware.
Pull all cabinet doors, drawer fronts, and hardware. Number each door so it goes back on the exact same hinge pin later. Wash every piece with TSP (trisodium phosphate) or a heavy-duty degreaser. Cooking oil and grease trapped in wood grain will completely ruin stain adhesion if sanded into the fibers.
2.Stripping Old Finish: Chemical Stripper vs. Mechanical Sanding.
If the old varnish or lacquer is thick, apply a chemical finish stripper to break down the top layer. Scrape off softened varnish using a plastic putty knife to avoid gouging the wood face. Once dry, sand the raw wood flat using an orbital sander starting with 120-grit, stepping up to 150-grit, and finishing with 180-grit paper.
3.Pre-Stain Conditioning: Equalize Absorption on Closed-Pore Woods.
If you are restaining kitchen cupboards made of birch, maple, or pine, apply a wood conditioner or clear pre-stain sealer before applying stain. Closed-pore woods absorb stain unevenly; conditioning prevents dark blotches and streaks across wide door panels.
4.Applying the New Stain: Wiping Stains, Dyes, or Gel Stains.
Apply your stain using a clean rag, foam brush, or spray gun. For open-pored woods like oak, work wiping stain into the grain and wipe off excess immediately. If you want to darken existing cabinets without stripping all the way down to bare wood, use a gel stain—it sits on top of old finishes like a semi-transparent glaze.
5.Sealing & Topcoating: Lock in the Color.
Once the stain has cured for 24 hours, apply two to three light coats of non-yellowing polyurethane, conversion varnish, or water-borne acrylic clear coat. Lightly sand between topcoats with a 320-grit sanding sponge to knock down dust nibs.
Shop Tip for Veneered Center Panels: Many raised-panel and shaker cabinet doors feature a solid hardwood frame paired with a thin, veneered flat center panel. When sanding the center panel, turn down your orbital sander speed and use light pressure with 180-grit paper. The face veneer on cabinet doors can be thin, and burning through the wood face to the glue line ruins the door instantly.
Common Restaining Pitfalls to Avoid
- Skipping the 180-Grit Step: Sanding with paper coarser than 120-grit leaves visible orbital swirl marks under dark stains. Sanding finer than 220-grit burnishes the wood face, preventing natural stain absorption.
- Staining Over Old Wax or Silicone: Furniture polishes containing silicone seep into wood pores and cause "fish-eyes" (crater-like voids) in your wet stain. Clean old doors with mineral spirits before sanding.
- Rushing Dry Times: Applying a clear topcoat over a wiping stain that hasn't fully off-gassed will pull the stain pigment right back out of the grain, turning your clear finish cloudy.
Restaining kitchen cabinet doors requires patience and clean prep, but doing it yourself lets you restore kitchen cabinets to their original beauty for a small fraction of a contractor's replacement quote. By thoroughly degreasing the surfaces, stepping up through your sandpaper grits properly, and controlling your stain absorption with a pre-stain sealer, you deliver a clean, durable finish that makes old cabinetry look brand new.