


Yes, you can absolutely stain wood veneer just like you would stain solid wood. At its core, veneer is a thin, high-quality layer of real wood, meaning it accepts and reacts to stains—from light finishes to deep, rich colors—in the same way that a solid plank does. The key is proper preparation and technique, especially when working with large veneer panels or highly figured veneer sheets.
Here is a step-by-step guide on how to successfully stain your veneer wood project.
5 Steps to Stain Wood Veneer Sheets
1. Prepare and Sand the Surface
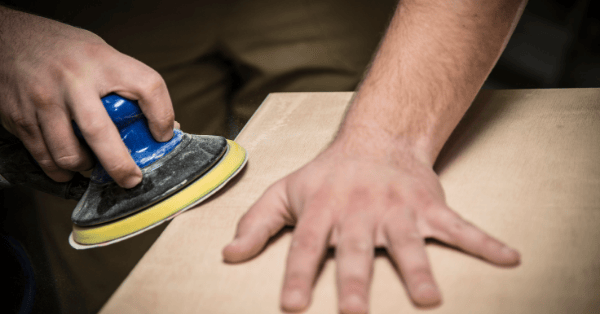
Proper surface preparation is crucial. Since wood veneer sheets are thin (typically 0.5mm to 1.5mm), extra care must be taken during sanding.
-
Sand Evenly: Sand the surface uniformly with fine-grit sandpaper. Start with 120-grit to remove surface imperfections, then finish with 220-grit. The final sanding step is essential to open up the wood pores for optimal stain absorption.
-
Avoid Over-Sanding: Never sand through the thin layer of wood veneer. This is the biggest risk. Sand only in the direction of the wood grain and apply light, consistent pressure.
2. Test the Stain Color
Before committing to your entire project (whether it's wood veneer for cabinets or a piece of wood veneer for furniture), always test the stain. Apply the chosen color to a small, inconspicuous area of the veneer or, ideally, use a scrap piece of the same type of wood veneer. This ensures you achieve the desired final color and appearance.
3. Apply the Stain
Use a quality brush, cloth, or foam sponge to apply the stain.
-
Work with the Grain: Always apply the stain smoothly in the direction of the wood grain for a uniform, professional finish.
-
Multiple Coats: You can apply multiple coats to achieve a darker or richer color. Be sure to let each coat dry completely according to the manufacturer's instructions before applying the next coat.
4. Wipe off Excess
Staining is a process of absorption. After letting the stain sit for a few minutes (check the product's guidelines), use a clean, lint-free cloth to gently wipe off any excess pigment. This critical step helps prevent blotching and ensures an even, beautiful tone across the entire surface of your veneer panels.
5. Seal and Protect the Finish
Once the stain has completely dried, you must protect the finish. For high-traffic areas, like wood veneer for cabinets or tables, a protective topcoat is essential for durability and longevity.
-
Protective Finishes: Apply a clear coat of varnish, polyurethane, or lacquer. This not only enhances the color depth but also seals the surface, ensuring the finished product can withstand daily wear and tear.
-
Drying Time: Allow the stain and final sealant to cure fully according to the manufacturer’s instructions before handling or installing the veneered surface.
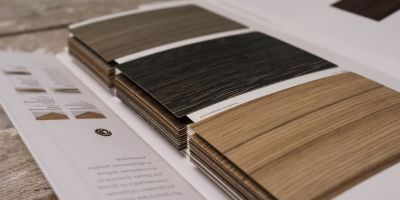
Special Considerations for Different Veneer Types
While all real wood veneer can be stained, the preparation and application process differs slightly based on the type you are working with:
-
Raw Veneer: Since this veneer is unprocessed, it absorbs stains perfectly and is the easiest type to finish.
-
Paper-Backed Veneer: This popular, easy-to-handle flexible sheet veneer can be stained successfully, but the paper backing might slightly influence how much moisture the wood absorbs, making careful application even more important.
-
Pre-Finished Veneer: This cannot be stained directly. The existing factory finish must be completely stripped and thoroughly sanded down to the raw wood before any new stain can be applied.